
By Chris Barnes · Former pool-service company owner · 7+ years of residential and commercial experience
Learning how to clean a cartridge pool filter safely starts with pressure relief—not with removing the lid. Shut off the pump, prevent an automatic restart, open the manual air-relief valve as the manufacturer directs, and confirm the pressure gauge reads zero before touching the filter closure. Then remove and rinse the cartridges according to the exact model manual, inspect every sealing and filtering surface, reassemble the tank correctly, and vent all trapped air during restart.
Critical safety warning: A pool filter is a pressure vessel. Trapped air can cause the lid or closure to separate violently. Never loosen a clamp, locking ring, lid, gauge, drain plug, or plumbing connection while the pump is running or the system is pressurized. Disconnect power at the breaker, prevent automatic restart, open the manual air relief, and verify the gauge reads zero. If the tank, closure, clamp, relief valve, gauge, or wiring is damaged or unfamiliar, stop and call a qualified pool professional.
How to Clean a Cartridge Pool Filter: The Quick Answer
Use the shutdown, disassembly, and restart procedure in the manual for your exact filter. In the safest general order: identify the model, turn the pump off at the breaker, disable schedules, open the air-relief valve, verify zero pressure, drain and open the tank exactly as directed, remove the cartridges, rinse between the pleats with a garden hose, inspect the elements and seals, reassemble the closure precisely, then restart with the air relief open until a steady stream of water appears.
Do not use a pressure washer, wire brush, household detergent, or mystery chemical. Do not improvise clamp torque or lid alignment. Cartridge filters differ in their closure systems, internal manifolds, drain arrangements, and startup procedures, so the model manual—not a generic video—controls the details.
When Should You Clean a Cartridge Pool Filter?
Start with the clean-filter pressure recorded at the same pump speed and valve position you normally use. The filter manufacturer may specify cleaning after a particular pressure rise. Pentair, for example, states that some Clean & Clear models should be cleaned when pressure reaches roughly 8–10 psi above the starting pressure. That is a model-specific direction, not a universal rule for every filter.
Clean sooner when flow falls noticeably, the heater or salt system reports low flow, the pool has been through an algae cleanup, or wind, pollen, wildfire ash, construction dust, or heavy debris has loaded the cartridges. A calendar alone cannot tell you how much material your filter has collected.
| What you notice | What it may mean | Best next check |
|---|---|---|
| Pressure has risen from the clean baseline | The filter may be collecting debris or another return-side restriction may exist | Follow the model’s cleaning threshold and inspect the full return path |
| Pressure is low and returns are weak | Water may not be reaching the pump correctly | Check water level, baskets, valves, prime, and suction-side air before blaming the cartridges |
| Pressure rises again soon after cleaning | Active algae, fine debris, damaged media, or a circulation problem may still be present | Test the water and inspect the cartridges, manifolds, and system configuration |
| Gauge does not return to zero when relieved | The gauge may be damaged or unreliable | Do not rely on it for service decisions; replace it as the manual directs |
Use the pool-filter pressure guide to interpret the gauge before opening the tank. High pressure and low pressure point in different diagnostic directions.
Before You Open the Filter
- Find the manufacturer, full model number, and current manual.
- Photograph valve positions and the assembled filter before changing anything.
- Record the pump speed and operating pressure.
- Choose a drainage area allowed by local rules and away from electrical equipment.
- Have a garden hose with a straight-flow or cartridge-cleaning nozzle, eye protection, gloves, and clean towels ready.
- Inspect the tank, base, closure, gauge, air-relief assembly, and plumbing from the outside.
- Stop if you see a cracked tank, distorted lid, corroded or damaged clamp, stripped hardware, leaking electrical equipment, or an unreliable relief valve.
If you cannot positively identify the filter, photograph the label and compare it with the manufacturer’s support materials. Similar-looking filters can use different closure and reassembly procedures. The pool-equipment glossary can help you name the parts, while the filter comparison guide can confirm whether the system is cartridge, sand, or D.E.
How to Clean a Cartridge Pool Filter in 9 Safe Steps
1. Identify the Exact Filter and Read Its Procedure
Locate the model label before starting. Read the manufacturer’s sections for shutdown, pressure relief, opening, cartridge cleaning, closure installation, and startup. Note the exact order, required tools, replacement O-ring specification, and any clamp or locking-ring requirements.
2. Turn Off Power and Prevent Automatic Restart
Stop the pump and disconnect power at the circuit breaker as the manual directs. Disable automation, schedules, freeze protection, and remote commands that could restart the pump while the filter is open. A control-panel “off” button alone may not prevent every programmed start.
3. Release All Air and Pressure
Open the manual air-relief valve and leave it open. Confirm the pressure gauge falls to zero and that water movement has stopped. Follow the model’s valve and drain instructions. Never assume the tank is safe merely because the pump is quiet.
4. Drain and Open the Tank Exactly as Directed
Use the manufacturer’s sequence for the drain, clamp, locking ring, or lid. Keep your face and body clear of the closure. Do not force plastic parts, strike components unless the manual specifically calls for a suitable tool, or substitute a guessed torque. If the closure does not release normally after pressure is confirmed at zero, stop and investigate rather than prying it open.
5. Remove the Cartridges Without Losing the Layout
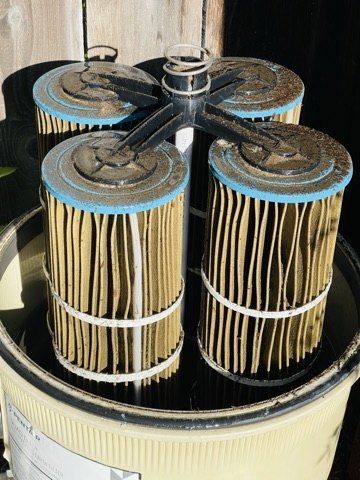
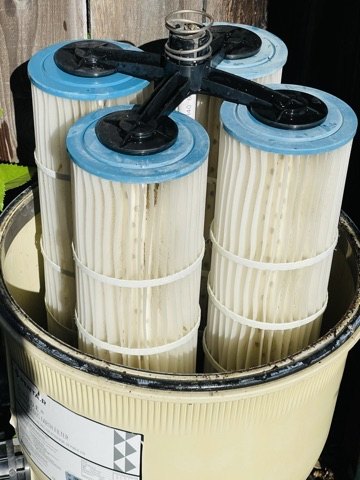
Photograph the manifold, spacers, air-bleed parts, and cartridge orientation before removal. Lift components carefully and place them on a clean surface. Multiple-cartridge filters must go back together in the correct arrangement with every internal part seated as designed.
6. Rinse From Top to Bottom and Between the Pleats
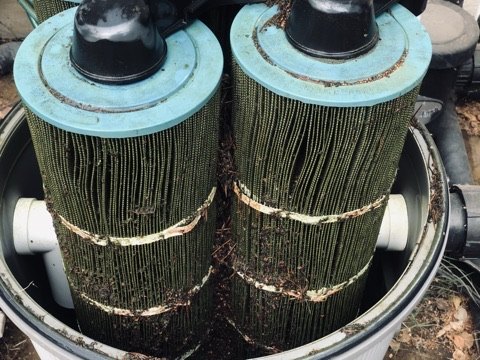
Use a garden hose and a straight, controlled stream. Pentair’s Clean & Clear Plus instructions direct the nozzle at about a 45-degree angle and emphasize washing between the pleats from top to bottom. Rotate the element and work methodically so dirt moves down and away instead of being driven deeper into the fabric.
Avoid a pressure washer or concentrated jet that can damage the media. Remove leaves and large debris by hand only after the system is safely open and de-energized. Rinse the tank and manifold as the manual permits, keeping debris out of plumbing openings.
7. Inspect the Elements, Internals, and Seals
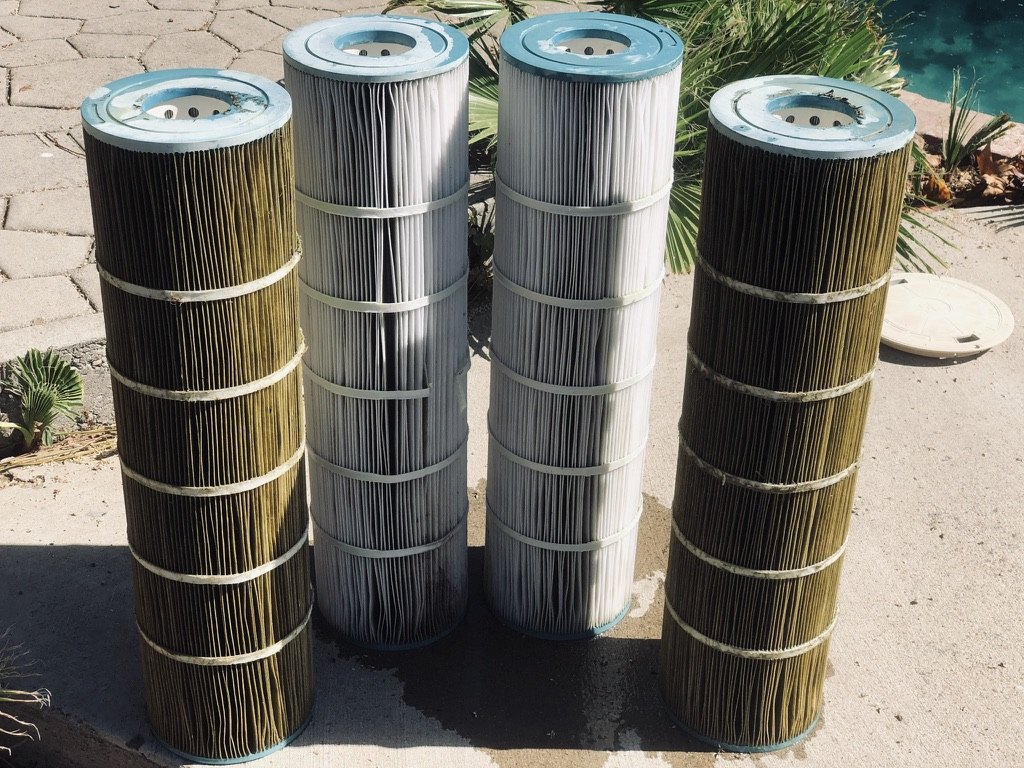
- Pleats: look for tears, holes, collapsed sections, embedded material, or fabric separating from the end cap.
- Bands: replace cartridges with broken or detached support bands when the manufacturer calls for replacement.
- End caps: check for cracks, distortion, and poor sealing surfaces.
- Manifolds and standpipes: look for cracks, missing pieces, and incorrect fit.
- Tank O-ring: clean and inspect it for flattening, stretching, cuts, swelling, or hardening.
- Air-relief screen and internal bleed parts: clean and reinstall them exactly as shown in the manual.
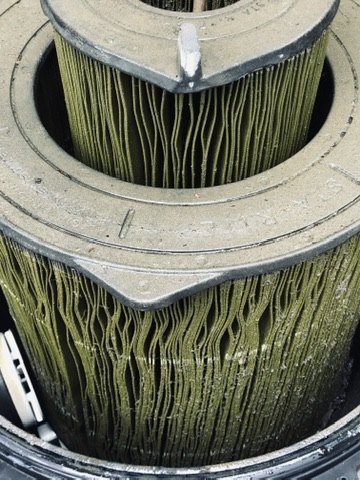
If oils or mineral scale remain after rinsing, use only the cleaner and soaking procedure approved for the exact cartridge. Do not combine cleaning products, and never mix acid with chlorine or chlorinated residue. Acid cleaning is not a routine first step and may set oils into the media if the cartridge has not been properly degreased. When the procedure or chemical history is uncertain, use a qualified professional.
8. Reassemble the Filter Precisely
Reinstall the bottom manifold, cartridges, top manifold, spacers, spring, air-bleed parts, and lid in the documented order. Clean the tank flange and seat the correct O-ring evenly. Use only manufacturer-approved lubricant when specified; do not use petroleum jelly unless the manual explicitly permits it.
Install the clamp or locking ring exactly as instructed. This is not a place to improvise. A missing part, misaligned lid, damaged closure, or incorrectly tightened clamp can create a dangerous pressure-vessel failure.
9. Restart With the Air Relief Open and Stand Clear
Confirm the return path is open and every winterizing plug or service cap is in the correct operating position. Keep the manual air-relief valve open, stand clear of the filter, and restore power using the model’s startup procedure. Close the air relief only after a steady, air-free stream of water appears.
Shut the pump off immediately if the closure leaks, the gauge shows pressure before water exits the relief valve, a solid stream does not appear within the manufacturer’s expected time, or the filter makes an unusual sound. Once operation is stable, record the new clean-filter pressure at the normal pump speed and valve position.
Should You Clean or Replace the Cartridge?
Cleaning removes debris; it does not repair damaged media. Replacement deserves consideration when pleats are torn or crushed, end caps are cracked, support bands have failed, the cartridge no longer fits correctly, or pressure and clarity problems persist after the rest of the system has been checked.
Buy by the complete filter and cartridge model, not by appearance alone. Measure only as a secondary check. The wrong element can bypass debris, restrict flow, or fail to seat against the manifolds.
Seven Cartridge-Filter Cleaning Mistakes to Avoid
- Opening the tank before disabling power and proving zero pressure.
- Using another model’s clamp, locking-ring, or startup instructions.
- Cleaning only the outside of the pleats and missing debris deep between them.
- Using a pressure washer, wire brush, or harsh unapproved chemical.
- Reinstalling a torn cartridge or damaged O-ring because it “looks good enough.”
- Starting the pump with the air relief closed or a return path blocked.
- Forgetting to record the clean pressure at the same pump speed.
Cleaning the filter will not correct active algae, inadequate sanitizer, a suction-side air leak, or an incorrectly positioned valve. If the water remains cloudy, use the cloudy-water diagnostic. For active green water, follow the green-pool recovery process and expect the filter to load more quickly while dead algae is removed.
How to Clean a Cartridge Pool Filter: Common Questions
How often should a cartridge pool filter be cleaned?
Use the pressure rise, flow change, debris load, and cleaning threshold in the filter manual. Weather, trees, swimmer load, algae cleanup, filter size, and pump speed can make one pool’s schedule very different from another’s.
Can I use a pressure washer on pool-filter cartridges?
No. A pressure washer or overly concentrated stream can damage pleated media. Use the hose method and nozzle direction specified by the cartridge manufacturer.
Why is the pressure still high after cleaning?
The cartridges may still contain oils, minerals, or fine debris; the elements or manifolds may be damaged; a return valve may be restricted; or the gauge may be inaccurate. Compare conditions at the same pump speed and use the exact filter manual before repeating service.
Why did filter pressure drop after cleaning?
A moderate return toward the clean baseline is expected. Very low pressure with weak returns may indicate low water, clogged baskets, a valve problem, loss of pump prime, a suction-side air leak, or incorrect reassembly. Use the pump-prime troubleshooting guide if air is entering the system.
Can I soak a cartridge pool filter overnight?
Only use the product, dilution, container, time, and rinse procedure approved by the cartridge and cleaner manufacturers. Do not improvise with household cleaners or mix chemicals. When previous chemical use is unknown, replace the element or ask a qualified professional.
The Bottom Line
The most important part of learning how to clean a cartridge pool filter is controlling stored pressure. Identify the model, disconnect power, prevent automatic restart, vent the tank, prove zero pressure, and follow the exact opening and closure instructions. Rinse gently between the pleats, replace damaged media, restart with the air relief open, and record the new clean-pressure baseline.
If any pressure, electrical, closure, or tank condition is questionable, keep the system off and call a qualified pool professional. For the rest of the circulation system, visit the equipment guide or send photos and model details through Ask Chris.
Sources and Review Notes
Written and field-reviewed by Chris Barnes. Former Northern California pool-service company owner with more than seven years of residential and commercial experience. Last reviewed September 10, 2026. The manual for the exact installed filter, product labels, and applicable local requirements take priority.