
If your pool heater won’t ignite, the problem is often not the igniter itself. A heater will wait for several conditions before it opens the gas valve and starts a flame: a heat request, adequate water flow, a valid temperature reading, safe airflow, available fuel, and closed safety switches. A missing condition can make the heater appear dead, start its blower without firing, or try several times before entering lockout.
Safety first: Stop immediately if you smell gas, hear gas escaping, see soot or smoke, see flame outside the firebox, hear a boom or delayed ignition, have a carbon-monoxide alarm, or get repeated ignition lockouts. Do not touch electrical switches or use a phone near a suspected gas leak. Leave the area and call your gas supplier or emergency services from a safe location. Never light a modern automatic-ignition pool heater by hand, open the burner compartment, test gas pressure, work on live wiring, or bypass a pressure, temperature, flame, airflow, or other safety switch.
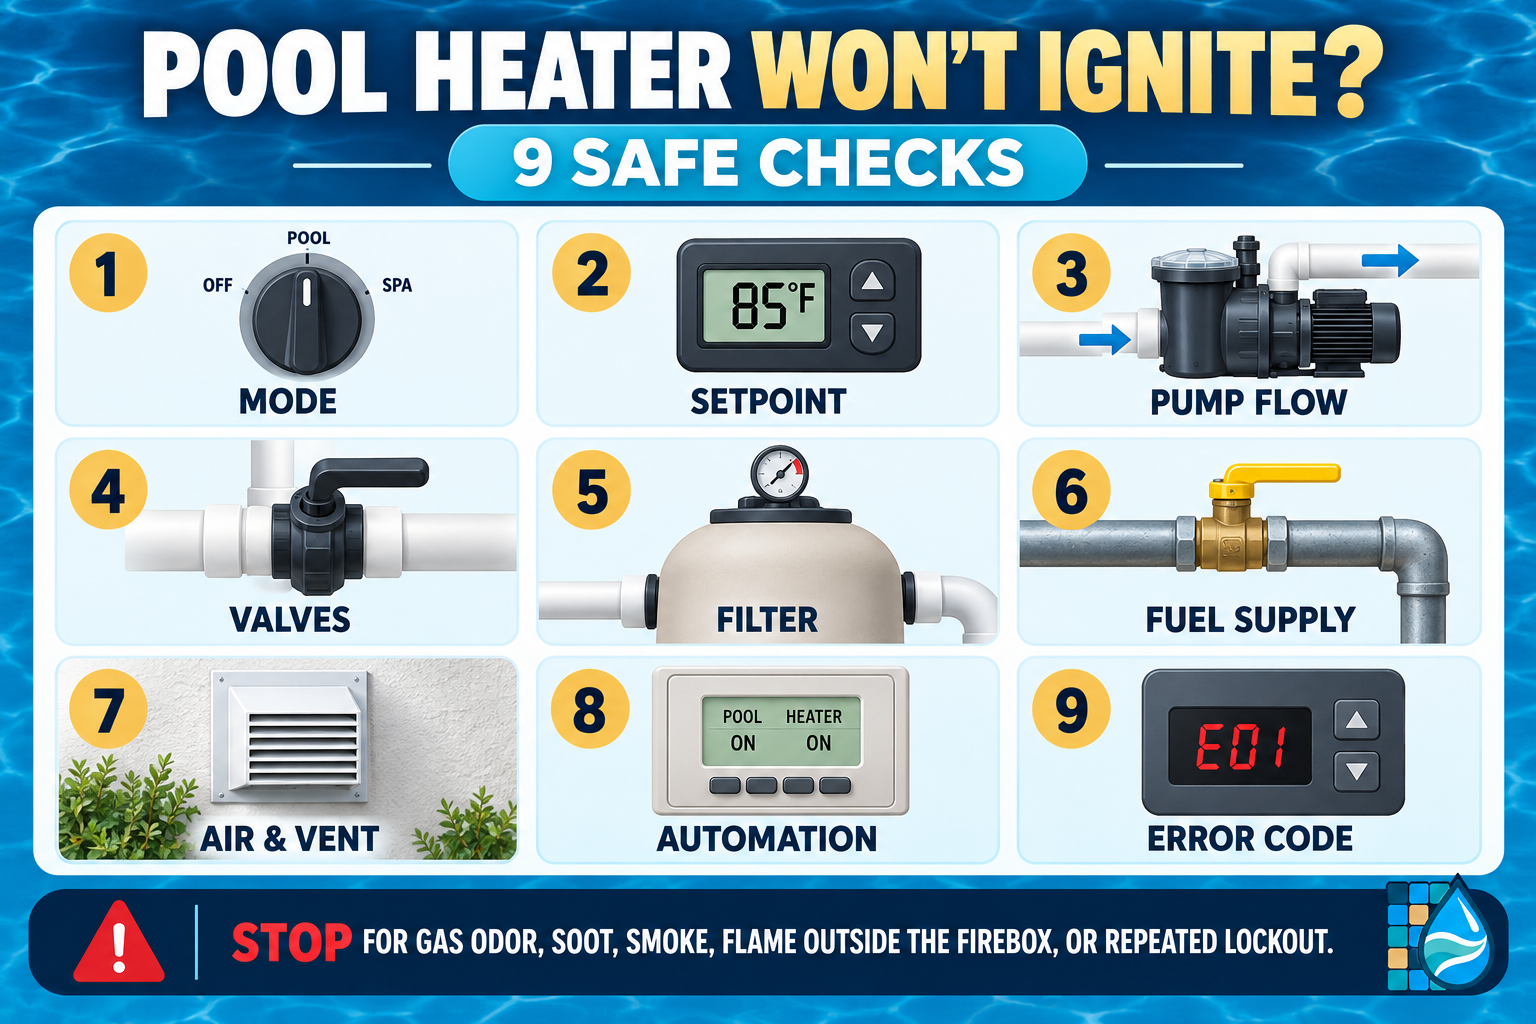
Pool heater won’t ignite? Start with these nine checks
- Confirm the heater is in Pool or Spa mode—not Off.
- Set the desired temperature above the displayed water temperature.
- Make sure the pump is running at enough speed for steady flow.
- Verify the normal heater-path valves are correctly positioned.
- Check baskets, filter pressure, and return flow for restrictions.
- Confirm the fuel supply without opening the heater or manipulating unfamiliar valves.
- Inspect the outside air intake and vent area for blockage.
- Confirm automation is actually sending a heat request.
- Photograph the error code and observe the startup sequence.
These are external observations, not instructions to service a gas appliance. If the heater reaches repeated lockout or displays a service-heater warning, leave it off and arrange qualified service.
What “won’t ignite” can look like
The phrase covers several different failure points. Note exactly what happens after you request heat; the sequence is often more useful than saying only that the heater does not work.
| What you observe | What it may mean | Safe next move |
|---|---|---|
| Display is blank | No power, open disconnect, tripped protection, damaged control, or display issue | Check only normal external controls; leave electrical testing to a qualified professional |
| Display is on but nothing starts | Off mode, setpoint already satisfied, automation not calling, flow switch open, or another safety condition | Check mode, setpoint, automation, pump flow, valves, baskets, and filter |
| Blower starts but no flame appears | Airflow, fuel, ignition, flame-sensing, grounding, or control fault | Record the code and stop after the model’s permitted attempt; do not open the cabinet |
| Heater lights briefly, then stops | Unstable flame signal, gas supply, venting, combustion, overheating, or water-flow problem | Leave it off and call for service, especially if the attempt repeats |
| Heater tries several times, then locks out | The control did not establish or prove flame | Do not keep resetting it; photograph the lockout code and call a qualified technician |
| Service System or flow warning appears | The heater is not receiving the water flow it requires | Correct external circulation issues first |
| Service Heater warning appears | The heater detected a fault that may require internal diagnosis | Shut it down and arrange qualified service |
Modern pool heaters generally use automatic ignition; there may be no standing pilot for a homeowner to relight. Manufacturer manuals describe startup safeguards and fault codes differently, so the label and exact model number matter. Use the pool-equipment model-number guide to record the heater information without removing a panel.
Before any troubleshooting: know when to stop
Gas and combustion problems are not DIY experiments. Turn the heater off and step away for any of these conditions:
- gas odor or a hissing sound near a fuel line;
- soot, scorching, smoke, or melted material;
- flame visible outside its intended combustion area;
- a boom, rumble, delayed ignition, or repeated hard-lighting sound;
- a carbon-monoxide alarm, headache, dizziness, or nausea near the equipment;
- a damaged vent, flooded heater, fire, impact damage, or severe corrosion;
- repeated ignition lockout after one model-approved reset;
- a breaker, GFCI, or fuse that trips again;
- exposed wiring, water in an electrical area, or a damaged gas connection.
Do not remove heater panels to “take a quick look.” The cabinet contains fuel controls, high voltage, hot surfaces, moving parts, and safety circuits. Never hold a safety switch closed, jumper a terminal, enlarge a gas orifice, adjust a regulator, or substitute a larger fuse or breaker.
1. Confirm the operating mode
Start at the normal user control. Make sure the heater is set to the body of water you want to heat—Pool or Spa—and is not in Off, standby, freeze-protection-only, remote-disable, or service mode.
For a combined pool-and-spa system, confirm the displayed mode matches the valve position. A controller can say Spa while valves remain in Pool position, or the opposite, if an actuator or automation command did not complete. Do not force an actuator or move valves blindly. Photograph the pad before changing anything.
Some automated systems require the heater’s local control to remain enabled at a high enough setting while the automation controls the actual temperature request. Follow the heater and automation manuals together; changing only one side can remove the heat call.
2. Raise the setpoint above the water temperature
A heater will not fire if it believes the water is already warm enough. Raise the setpoint a few degrees above the displayed water temperature and wait through the normal startup delay described in the manual. Do not set it to the maximum simply to force a response.
Compare the displayed water temperature with a separate pool thermometer. A small difference may be normal because sensors sit in different locations, but a large or obviously impossible reading can prevent a heat request. Record both temperatures for the technician; replacing or testing an internal sensor requires model-specific service procedures.
If the display says “heating” or shows a flame symbol but the burner never starts, continue with the external flow, valve, air, automation, and code checks below.
3. Make sure the pump is providing steady flow
Most pool heaters will not operate until a water-pressure or flow device proves circulation through the heat exchanger. The pump must be on, fully primed, and running at a speed that satisfies the heater.
From a safe position, check for:
- steady water under the clear pump lid;
- strong, continuous flow at the return jets;
- no large air pocket in the pump basket;
- no gulping at the skimmer or bursts of air from the returns;
- a pump speed appropriate for heating, especially on a variable-speed system.
If the pump is losing water or filling with air, turn the heater off first. Then use the pool-pump losing-prime guide. If the pump runs but circulation is weak, follow the low-pool-flow troubleshooting guide.
Do not raise pump speed indefinitely to overpower a restriction. The goal is to restore the designed circulation path, not hide a dirty filter, closed valve, blocked line, or air leak.
4. Verify the heater-path valves
A recent spa session, filter service, winterization step, cleaner setup, or water-feature change can leave a valve restricting the route through the heater. With the pump and heater off, compare the valves with a labeled photo or the normal operating diagram.
Confirm that water can travel from the pump, through the filter and heater, and back to the selected body of water. If the system has a manual heater bypass, make sure it is not diverting all flow around the heater. If there is an automatic bypass or actuator, observe only from the outside; do not force it or reach into moving parts.
Never move a filter multiport valve while the pump is running, and never operate with the multiport in Closed. If the plumbing is unfamiliar, use the pool-equipment glossary and have the lines professionally labeled before experimenting.
5. Check baskets, filter pressure, and return flow
A clogged skimmer basket, packed pump basket, dirty filter, closed return, or blocked fitting can reduce flow enough to keep the heater’s safety circuit open.
With power off and automation disabled, clean the skimmer and pump baskets according to their manuals. Compare filter pressure with the clean baseline at the same pump speed and valve positions. The trend matters more than one universal number.
- Pressure higher than the clean baseline with weak return flow suggests a dirty filter or downstream restriction.
- Pressure lower than normal with weak flow suggests low water, a suction restriction, an air leak, low speed, or loss of prime.
- Normal pressure and good flow with a persistent flow code may require inspection of the heater’s pressure/flow circuit, bypass, or sensor by a professional.
Use the high-filter-pressure guide if the gauge is elevated. Treat every filter as a pressure vessel: shut the pump off, open the manual air relief, wait until water and air stop escaping, and verify zero pressure before opening or servicing it.
6. Confirm fuel supply—without servicing the gas system
If circulation is normal and the heater is calling for heat, confirm only what is safely visible outside the appliance.
For natural gas, note whether other gas appliances are working and whether the utility account or neighborhood supply has been interrupted. For propane, read the tank gauge from a safe position and confirm that a scheduled delivery was not missed. An apparently nonempty tank does not prove correct operating pressure at the heater.
If you already know the location and normal position of a labeled external shutoff, you may visually compare it with your system documentation. Do not force a valve, open an unfamiliar valve, disconnect a line, bleed or purge gas, adjust a regulator, or test pressure yourself. If the fuel source was recently restored or the line was serviced, have the gas supplier or qualified heater technician perform the proper startup.
If there is any gas odor, do not continue checking. Leave the area without operating switches and call from a safe location.
7. Inspect the external air intake and vent area
Heaters need unobstructed combustion air and a correctly installed exhaust path. Leaves, plant growth, stored items, insect nests, snow, construction debris, or a damaged vent can interfere with airflow.
Without removing panels, look around the cabinet and vent termination. Clear only loose debris that can be safely removed from the exterior while the heater is off and cool. Preserve every clearance specified by the manual. Keep pool chemicals, fuel, furniture, towels, toys, and landscape materials away from the heater.
Do not insert tools into an opening, reach into the cabinet, alter a vent cap, cover louvers, or run the heater with a panel removed. Soot, scorching, unusual exhaust odor, visible condensation damage, a loose vent, or repeated airflow faults requires professional inspection before another attempt.
8. Confirm automation is actually calling for heat
Automation creates two layers of control: the heater must be available, and the controller must send the request. Review the app, panel, or schedule for the selected body of water, desired temperature, heat-source choice, and any cooldown or delay.
Check whether a recent power outage, firmware update, service visit, schedule edit, or switch from Pool to Spa changed the heat setting. If the automation reports “waiting,” “delay,” “solar preferred,” “heater disabled,” or a similar status, record it.
Use only the normal controls described in the manuals. Do not move wiring, short remote terminals, or bypass automation to force the heater on. A technician can determine whether the command is reaching the heater and whether the heater is returning a fault.
9. Record the error code and startup sequence
Before resetting anything, photograph the display and write down the complete sequence:
- Which mode and setpoint were selected?
- Was the pump running, and at what speed?
- Did the heater show a heat call?
- Did a blower or fan start?
- Did you hear clicking?
- Did flame appear briefly or not at all?
- How long did it run before stopping?
- What exact code or service light appeared?
- Did the same fault return after one manual-approved reset?
Codes are model-specific. “Ignition lockout,” “flame failure,” “weak flame,” “airflow,” “pressure,” and “ground” faults point in different directions. Do not use a code list for another model as a repair instruction.
Some heaters automatically purge and try ignition more than once before locking out. That programmed sequence is not permission to restart it repeatedly. After repeated lockout, leave it off. A qualified technician may need to verify gas pressure, ignition components, flame sensing, grounding, combustion air, venting, wiring, and safety-switch operation with the correct instruments.
A safe 10-minute homeowner checklist
If there is no gas odor, soot, smoke, abnormal flame, carbon-monoxide alarm, flood damage, repeated breaker trip, or repeated ignition lockout, use this short external check:
- Turn the heater off and let it cool.
- Photograph the display, equipment pad, valves, filter gauge, and model label.
- Confirm the selected Pool or Spa mode.
- Compare the setpoint with the displayed and measured water temperatures.
- Verify the pump is fully primed and producing steady return flow.
- Check water level and clean the skimmer and pump baskets with power off.
- Compare filter pressure with the clean baseline.
- Confirm the normal heater-path valves and automation heat request.
- Inspect only the outside air and vent area for obvious blockage or damage.
- Make one startup attempt only if the exact manual permits it and no stop condition is present.
If the fault returns, stop. More resets do not create safer ignition and can erase useful diagnostic information.
What a qualified technician should check
If the external conditions are correct, internal diagnosis may include the control history, wiring and grounding, transformer and supply voltage, pressure or flow switch, high-limit switches, air-pressure switch, temperature sensors, igniter, flame sensor, gas valve, inlet and manifold gas pressure, burner condition, combustion analysis, venting, heat exchanger, and automation interface.
The correct test order depends on the heater’s model, fuel, installation, altitude, vent arrangement, and displayed fault. Gas work may also require a licensed gas fitter, plumber, HVAC technician, electrician, permit, or combustion test under local rules. Ask the service company whether the technician is trained for your exact heater model and fuel type.
Provide these details when booking service:
- make, full model, serial number, and fuel type;
- exact fault code and photos of the display;
- Pool or Spa mode, setpoint, and measured water temperature;
- pump speed, filter pressure, and whether return flow is strong;
- what starts—pump, blower, clicking, flame—and when it stops;
- recent gas work, electrical work, storms, outages, flooding, or equipment changes;
- whether the fault is constant or only happens in one mode.
Common mistakes to avoid
- Trying to light an automatic-ignition heater by hand.
- Repeatedly clearing an ignition lockout.
- Removing panels while the heater is powered or attempting to start.
- Bypassing a flow, pressure, temperature, airflow, or flame safety.
- Assuming a flame-sensor code proves the sensor is dirty or defective.
- Increasing pump speed instead of correcting a restriction.
- Forcing unfamiliar valves or actuators.
- Opening, purging, or pressure-testing a gas line without qualification.
- Running with a damaged or modified vent.
- Replacing parts before recording the exact model, code, and startup sequence.
Frequently asked questions
Why does my pool heater click but not ignite?
Clicking can occur during the ignition sequence, but it does not identify the failed part. The cause may involve fuel supply, the igniter, flame sensing, grounding, airflow, a safety circuit, or the control itself. If the heater does not establish flame and enters lockout, leave it off and give the exact sequence and code to a qualified technician.
Can low water flow stop a pool heater from igniting?
Yes. Pool heaters normally require a water-pressure or flow condition before allowing ignition. Check pump prime, water level, baskets, valves, filter pressure, pump speed, and return flow. Never bypass the heater’s flow or pressure safety device.
Does a pool heater have a pilot light I can relight?
Many current pool heaters use automatic electronic ignition and have no standing pilot for the homeowner to light. Follow the exact model manual. Never place a flame inside the heater or try to manually light a burner.
Why does the heater light and then shut off?
A short run can be caused by lost flame proof, unstable fuel delivery, venting or combustion trouble, overheating, low flow, a sensor fault, or another safety condition. Because several causes involve gas and combustion, stop repeated attempts and arrange model-specific service.
Can a dirty pool filter cause an ignition problem?
A dirty filter can reduce water flow enough to prevent the heater from receiving permission to fire or can cause it to shut down. Compare pressure with the filter’s clean baseline and verify return flow. If the flow fault persists after circulation is restored, the heater needs professional diagnosis.
Should I reset an ignition lockout?
Only if the exact heater manual permits a user reset, every external condition is normal, and there is no gas odor, soot, smoke, abnormal sound, flame problem, or other stop condition. Make one attempt. If lockout returns, leave the heater off rather than resetting it again.
Why will the heater run in Spa mode but not Pool mode?
Pool and Spa modes can have different setpoints, schedules, valve positions, pump speeds, and automation commands. Compare those external settings. Do not rewire controls or force actuators; record the difference for service if the settings appear correct.
How can I find the correct heater manual?
Photograph the rating label from outside the cabinet and search the manufacturer’s official support site for the complete model number. Fuel type and model suffix matter. If the label is damaged or inaccessible, send a wide equipment-pad photo and close-up of the exterior to a qualified dealer.
The bottom line
When a pool heater won’t ignite, start with the heat request and the water path: mode, setpoint, pump flow, valves, baskets, filter, automation, and the external air and vent area. Record the exact fault and startup sequence before one model-approved reset.
Stop for gas odor, soot, smoke, flame outside the firebox, abnormal ignition sounds, a carbon-monoxide alarm, repeated lockout, breaker trips, or damaged wiring or venting. Never open the burner compartment or bypass a safety. Once the external conditions are correct, gas, combustion, ignition, flame-sensing, and electrical diagnosis belong to a qualified professional.
Chris Barnes is a former pool-service company owner with more than seven years of residential and commercial pool-service experience. Swimming Pool Resource turns field experience and current manufacturer guidance into practical steps homeowners can use to troubleshoot, service, and maintain their pools.
Need help interpreting the startup sequence? Ask Chris about your pool and include one wide equipment-pad photo, one close-up of the heater label, the exact error code, and what happened before the heater stopped.