
How to Prime a Pool Pump: Step-by-Step Guide
A safe, practical way to fill the pump with water, clear trapped air, recognize a successful prime, and diagnose why the water will not start moving.
Priming replaces air with water.
To prime a pool pump, shut off power before opening it, relieve system pressure, fill the strainer housing with clean pool water, reseat the lid and O-ring, open the correct suction and return valves, then start the pump while the filter air-relief valve is open.
When a steady stream of water exits the air-relief valve, close it. The pump basket should stay mostly full and the pool returns should produce steady flow.
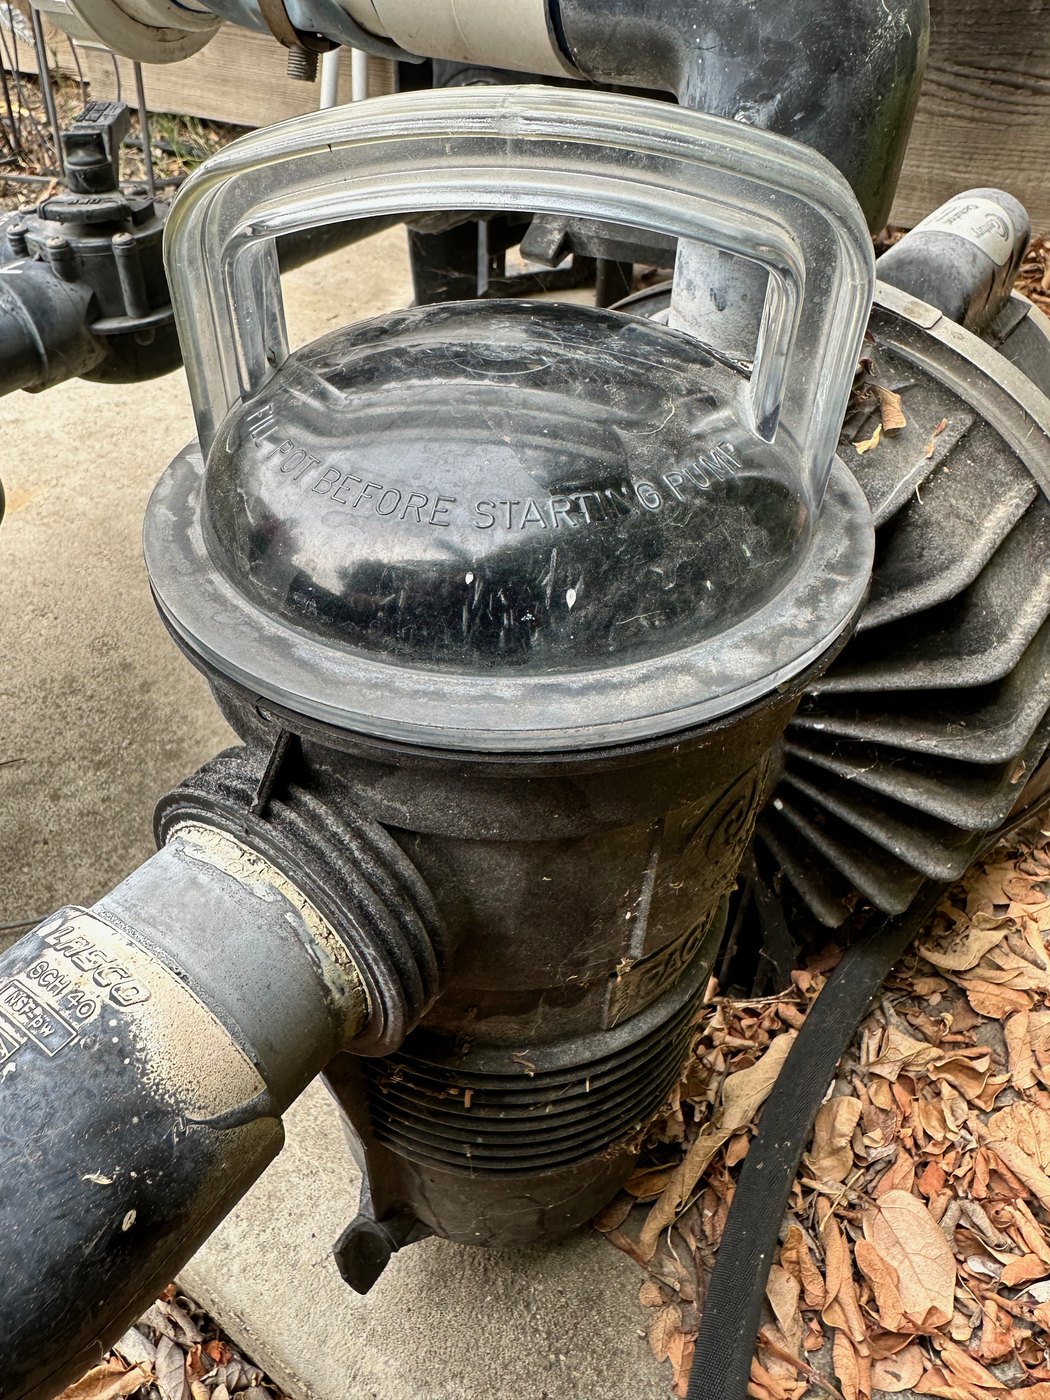
The pump lid gives the first instruction.
This lid is embossed with a reminder to fill the pot before starting the pump. That simple step gives the impeller water to move and protects the mechanical seal while the suction line clears its air.
The clear lid also becomes a diagnostic window: rising water means the pump is beginning to catch prime; repeated emptying usually points to low pool water, the wrong valve position, a blocked suction path, or an air leak.
Before you remove the pump lid
The exact procedure depends on whether the pump sits above or below the pool waterline and on the pump model. Read the pump and filter manuals first; their valve sequence and maximum priming time control.
- Pool water is around the middle of the skimmer opening.
- Skimmer and pump baskets are clear.
- Return path is open and winter plugs are removed.
- Suction valves are positioned for the line you want to prime.
- Pump-lid sealing surface is clean.
- O-ring is present, undamaged, and properly seated.
Do not add chlorine, acid, or any undiluted chemical into the pump pot. Pentair manuals specifically warn that adding chemicals directly in front of the pump suction can damage equipment.
How to prime the pump, step by step
This is the common setup in which the pump must lift water from the pool. Use your manufacturer's instructions whenever they differ.
Stop the pump and isolate power
Use the pump's stop control, place automation in service mode if applicable, and switch off the correct circuit breaker before touching the lid.
Relieve filter pressure
Open the filter's manual air-relief valve. Confirm that the pressure gauge reads zero before loosening any closure.
Remove the lid and inspect the seal
Take out leaves or debris. Clean the lid groove and sealing surface. Check that the O-ring is flexible, undamaged, and seated flat. Use only the lubricant or installation method approved for that exact pump; some manufacturers specify no lubricant.
Fill the strainer housing
Pour in clean pool water until the pot is full or reaches the suction opening. Filling the pot gives the impeller water to move while air is evacuated from the suction line.
Refit the lid correctly
Install the basket in its proper orientation, seat the lid evenly, and hand-tighten according to the manual. Do not use tools or force a lid that is not aligned.
Open the intended flow path
Open at least one pool suction line and the return line. Make sure the valves are not deadheading the pump. If you have a multiport filter valve, never move it while the pump is running.
Restore power and start the prime cycle
Stand clear of the filter. Start the pump at the manufacturer-specified priming setting. Variable-speed models may automatically ramp to a programmed priming speed.
Vent the air, then close the relief valve
Watch for the pot to fill and for water to move through the clear lid. Once a steady, air-free stream comes from the filter air-relief valve, close it.
Gravity may fill the pump for you.
When the pump sits below pool level, opening the isolation valves can allow the strainer housing to fill by gravity. Jandy's startup guidance says to secure the lid, open the isolation valves, open the filter air-relief valve, then start the pump and close the relief valve when water emerges.
Four signs the pump is primed
It stays mostly full instead of repeatedly emptying.
Flow is steady rather than spitting large bursts of air.
The gauge establishes the system's normal clean pressure.
The harsh gurgle fades into a smooth, consistent operating sound.
A small air pocket under some clear lids can be normal at low variable-speed settings. A pot that repeatedly drains, a stream of bubbles returning to the pool, or a filter that will not build pressure points to an unresolved problem.
Diagnose the pattern instead of adding more water.
| What you see | Likely causes | What to check next |
|---|---|---|
| The pot drains as soon as the pump starts | Closed or mispositioned suction valve, low pool water, stuck skimmer weir, lid air leak. | Stop the pump. Verify water level, valve position, skimmer flow, lid seal, and union tightness. |
| Water churns but never fills the pot | Suction-side air leak, long/high suction lift, blocked line, debris at lid O-ring. | Clean and reseat the lid seal; inspect unions, drain plugs, and exposed suction plumbing. Follow the model's priming-speed guidance. |
| It primes, then loses prime | Skimmer drawing air, water level dropping, suction leak, intermittent valve or weir problem. | Watch the skimmer while running and look for a vortex. Recheck the lid, plugs, unions, and suction valves. |
| Bubbles continue at the returns | Air entering before the impeller—often the lid O-ring, union, drain plug, or skimmer. | Start at the pump lid and work backward toward the pool. Never use an open flame to look for leaks. |
| Pressure rises unusually high | Closed return valve, dirty filter, blocked return path, incorrect multiport position. | Shut down Relieve pressure and correct the restriction before restarting. |
| The motor hums, trips, leaks, or overheats | Electrical, motor, impeller, capacitor, or shaft-seal problem. | Call a professional Turn off the breaker. Do not reach into the pump or electrical compartment. |
Pentair lists low water, clogged baskets or impeller, a suction leak, a valve in the wrong position, and a dirty filter among common causes of inadequate flow. Jandy advises checking for a suction leak when correct priming steps do not produce a prime.
One pump-priming problem that required a little detective work involved a roof-mounted solar pool-heating system. Water was diverted from the equipment pad, sent through solar collectors on the roof, and then returned to the pool. The pump and plumbing near the equipment initially appeared normal, so the source of the problem was not obvious.
In areas with very hot summers, roof temperatures, ultraviolet exposure, and repeated expansion and contraction can place considerable stress on exposed PVC plumbing. Over time, joints may begin leaking and allow the solar circuit to drain or pull in air. That air can make it difficult for the pump to establish or maintain its prime.
When the system had correctly identified and labeled isolation and bypass valves, a temporary solution was to turn the pump off and safely bypass the solar circuit while keeping a normal return path open. This allowed the pool to circulate until a qualified solar contractor could repair the roof plumbing. Homeowners should not experiment with unfamiliar valves while the pump is running or climb onto a roof to search for the leak. The lesson was to trace the entire circulation system—including optional equipment located far from the pump—when the usual priming checks do not reveal the cause.
There is no universal priming time.
Most residential systems
You should see visible progress soon after startup: the water level rises in the pot, air moves through the filter vent, and return flow begins. If nothing changes, stop and troubleshoot rather than repeatedly running the pump dry.
Manufacturer limits vary
Some Pentair manuals permit a priming attempt up to 30 minutes; certain Jandy installations at high suction lift may take 6–15 minutes. Those are model-specific limits, not a reason to let an unverified system run unattended.
Variable-speed pumps often use a higher temporary speed to establish prime, then drop to the programmed operating speed. Do not assume the fastest setting is always correct. Excessive speed against a closed or restricted system can create a dangerous pressure condition.
Six priming mistakes that create bigger repairs
Starting dry
The shaft seal relies on water. Fill the pot before startup after service or a loss of prime.
Opening under pressure
Always stop the pump and vent the filter before loosening a lid or clamp.
Wrong valve position
A closed suction or return path can prevent prime or dangerously raise pressure.
Overtightening the lid
Tools can damage lids and locking rings. Align and hand-tighten as the manual specifies.
Ignoring the O-ring
One leaf, a flattened seal, or a pinched O-ring can admit enough air to stop priming.
Pouring in chemicals
The pump pot is not a chemical feeder. Use clean water only for priming.
Pool pump priming FAQ
Do I need to prime the pump after cleaning its basket?
If the strainer pot drained or the lid was opened on an above-water installation, refill the housing and follow the startup procedure. A pump below water level may refill by gravity after its isolation valves are reopened.
Can I use a garden hose to fill the pump pot?
Yes, clean water from a hose is commonly used to fill the open strainer housing. Do not attempt to pressure-seal the hose to the plumbing, and never add chemicals through the pot.
Should I leave the filter air-relief valve open?
Leave it open during startup so trapped air can escape. Close it when a steady stream of water appears. If water does not appear as your filter manual describes, shut down and troubleshoot.
Why does my pump need priming every morning?
A properly sealed system normally retains water between cycles. Repeated loss of prime suggests a leak, low water level, valve issue, or plumbing problem that should be corrected rather than treated as a daily ritual.
When should I stop and call a pool professional?
Get qualified help for a cracked or warped lid, damaged housing, recurring loss of prime, leaking shaft seal, breaker trips, burned smell, unusual motor noise, inaccessible plumbing leak, or any electrical work.
Keep the entire circulation system healthy.
Priming solves an air-filled pump—not the condition that caused it. Use the equipment hub to trace recurring flow problems or ask Chris about the setup at your pool.
Also helpful: test pool water accurately and troubleshoot cloudy water.